Saturday, March 30, 2013

Happy Easter!

I would like to wish each and every one of you a very blessed Easter tomorrow. May you celebrate the reason for the season with family, friends, and create many wonderful happy memories. :)

This pic is of 2 vintage lovelies my mother & I revived for Artifactory. Don't you just love that sweet sheep & bunny? I adore the way my mom added the perfect touch of millinery and velvet ribbon!

Thanks for stopping by! Check back tomorrow as I have some major exciting news to share!
Amy

Sunday, March 24, 2013

Artifactory!

Hello my beautiful friends!  Just wanted to share a new venture I have been working on behind the scenes, Artifactory!  What is "artifactory" you ask?  I must say it is a very cool word my brother came up with...it encompasses everything I love...repurposing & redesigning old & vintage "artifacts" through clever transformation into works of art.  :)

My mother, is where my creative genetics come from.  She is extremely talented, and she has maddening skills with the sewing machine & painting/distressing furniture.  Her decor and holiday displays in her home are like no other.  Where my talent is lacking, she makes up for it.  We are a good team that definitely compliment each other's design styles.  From furniture & lamps, to home decor and unique vintage finds...we have something to offer many tastes.  Our dream is to someday open a storefront where we can sell our wares as well as teach our ideas and share our talents with the community.  Until then, we will be selling our vintage goods and creations up at the Rink Gallery in Bethany, OK.  We also plan on doing the Junk Hippy Show OKC in June.  This is definitely a bonding experience for my mother and I!  Not that we aren't already super close anyways.  :)

If you are up in the Oklahoma City area, you should stop by the Rink and check it out.  You will be glad you did!  Fellow Normanites, never fear as I hope to continue selling my antique windows at Tulips on Campus Corner!  Be on the lookout for Artifactory in the future!

Verdigris, a fabulous vintage store in OKC shared a wonderful quote the other day on Facebook.  I leave this for you to ponder..."We travel.  We collect.  We arrange.  We rearrange.  We mix the old with the new; the bought with the found; the passed-down with the picked-up-along-the way.  We create these beautiful little galleries throughout our homes that express our passions and curiosities to all who pass through.  And then, we start all over again."  Author Unknown

Monday, February 25, 2013

"Spring Into the Studio"

It's "Spring Into the Studio" over at Paper Issues!  The team has a fun blog hop going on just to get us excited for Spring.  There are some fabulous Spring project ideas they are sharing with you to get your creative juices flowing.  The project I would like to contribute is this "peace" window I created.  Bursting with loads of vivid color, this is definitely one of my faves.  I have noticed one of the hot color schemes for Spring is the melon & robin egg blue.  The fabulous paper in the background is a Paper Source exclusive, Marigold.  I love the navy vintage plate I used for the tile.  It pops off the marigold pattern beautifully.  I usually always try to get matchy matchy with my tile and papers, but this time I took a chance and tried something different.  I must say I was delighted with the outcome.

I hope that my window has inspired you, put a little spring in your step, or even just a put a little smile on your face.  :) Be sure and peruse the Paper Issues Blog Hop, not only will you get tons of inspiration, there is a fantastic prize up for grabs.  Studio Calico is the sponsor, need I say more? 

Thanks for stopping by!
Amy

Thursday, February 21, 2013

Game Spinner Prize Ribbon

I love making prize ribbons and for this project, I wanted to showcase as many different Tim Holtz products as possible.  It is much larger than one might expect from looking at the pictures.  it measures approximately 14" so it definitely can make a statement all on it's own.  I love the way it was displayed at CHA.  They placed it on the waist of a big wire mannequin!  In fact, in Tim's CHA recap he shared pics of it on his blog.  As you can imagine, that was very exciting for me!  :)

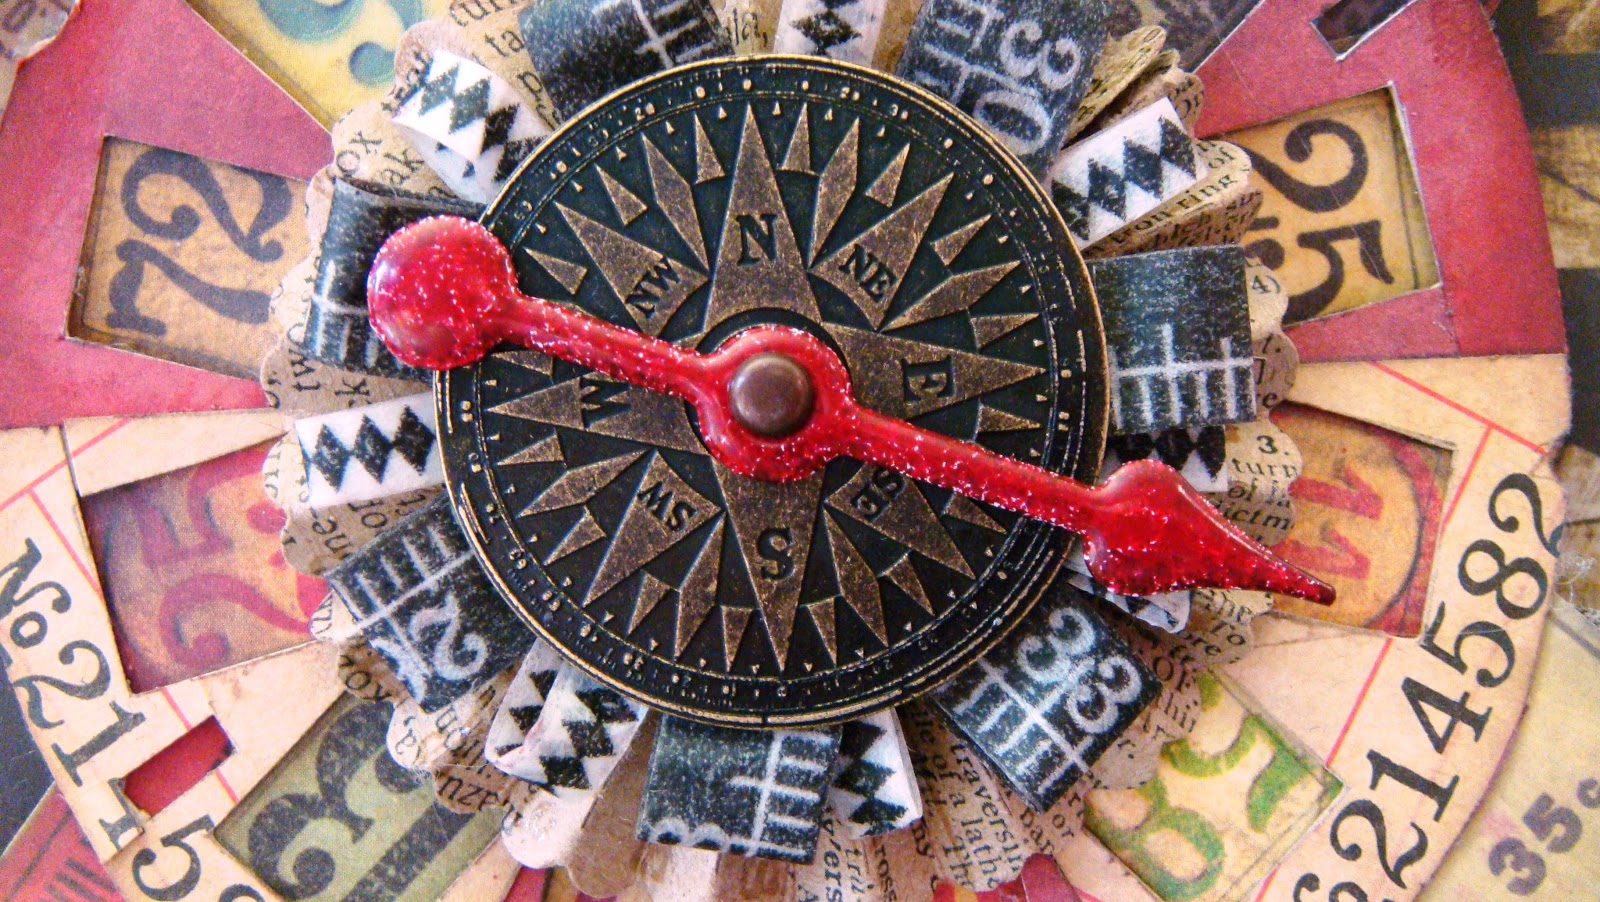
Starting out with the rosette part of the prize ribbon, I wanted to create somewhat of a vintage game spinner.  Using the new picture wheel was the perfect start.  Tim uses a plethora of numbers in his product, and it follows through on his papers.  One of my favorite designs is definitely the one that is a huge collage of vintage game pieces.  Taking the picture wheel I created, I cut and placed the numbers in all the windows.  To add some height, I created a mini rosette using the decorative strip/mini paper rosettes die.  I then added all the fringe and fluff by creating loops out of the new paper tape, the paper stash 12X12 & the fabulous tissue paper.  I used a game spinner covered in 5 layers of embossing powder to give it that thick, red look.
For the dangling ribbons, I wanted a fun mix of texture, color and varying widths.  I love, love, love the cloth measuring tape.  It is so authentic, it felt sinful to even cut into it.  Adding the thick paper strips at the back and the journaling tickets to the front, I was almost done.  Taking the white seem binding and dying it in varying shades of red ink added the perfect distressed color I was looking for. 

I am pleased to say this entire creation was made using all Tim Holtz product...DIES:  NEW BIGZ Picture Wheel & Sizzlits Paper Rosette; PAPER:  Paper Stash Lost & Found 12X12, Paper Stash Kraft Resist, Paper Stash Collage 8X8; Tissue Wrap-Melange, Journaling Tickets, Game Spinner, NEW Compass Coin, Ruler Ribbon, Lavish Trimmings, NEW Elements Tissue Tape, Ranger Red Embossing Powder & Fired Brick Distress Ink.

This is the final project I created for Tim Holtz at CHA.  I wish that I had had more time to create many more projects.  This was my very first experience designing for CHA, and I must say that Paula and Tim made it very educational and exciting through the entire process.  This is a memory I will never forget.  Thanks again Paula and Tim for trusting in me and giving me such a great opportunity!

Until next time,
Amy

Friday, February 1, 2013

Earth Angel Card/Tim Holtz CHA Project #3

Since I am still loving the hot trend right now with globes & maps, I decided to create a card for a friend using the globe motif.  Back in December, I created a dimensional wall piece out of a vintage pediment you can see here.  It was the catalyst that inspired this card. Tim Holtz' style portrays worldly, ecclectic & nostalgic in such a wonderful way...I knew I could create something fun.  Coupling lots of Tim's product both old and new, I created this sweet card.  I think the colors are so fresh with the aqua and kraft, coupled with the sentiment, I am sure it would brighten a dear friend's day.  Don't you? 

Here are my favorite details of the card...1.  the blended ink around the edges evokes a light and airy feeling, sort of like the sky (I LOVE how the resist on the paper accentuates the intricacy of the design.)  2.  That little airplane up in the corner, it is so cute and is part of the NEW Element Remnant Rub-ons.  3.  Last but certainly not least is the ROCK CANDY GLITTER!  I love the glistening it adds to the wings...I had never even heard of it until Tim mentioned it.  Let me just say, I am in love!!!  :)

With the exception of the copper sheeting, all the products used are Tim Holtz...BIGZ DIES:  Vintage Globe, Heart Wings & Regal Crest;  Chit-Chat Stickers, Kraft-Core Core'dinations Nostalgic, Paper Stash Kraft Resist 12X12, Alpha Tiles, Rock Candy Glitter, Paper Stash Collage 8X8, Tiny Attacher/Staples, Paper Twine & the NEW Element Remnant Rub-ons. 
Thanks so much for stopping by, have a great evening!
Amy

Tuesday, January 22, 2013

Let Your Heart Take Flight...

Last summer I created a window box titled "Follow Your Heart" for my niece.  For my 2nd Tim Holtz CHA project, I decided to create a different version of the "Follow Your Heart" only this time using all Tim Holtz product.  You can check out the original version here.  It is amazing how different the second version looks! 

Since the entire creation was to be housed in a window box, there is tons of layering.  I challenged myself to see how many die-cuts I could incorporate into the overall design.  By the time I had it all laid out, I had used 5 different dies!  Nearing completion, I felt there was something missing.  Asking for a different set of eyes to brainstorm finishing touches, my mom suggested creating clouds in the background.  To her, the design had a steampunk feel...the star in the center reminded her of propellers on an airplane.  What a great idea mom!  Now, my challenge was to create clouds using Tim's product.  Playing around with my tools & scraps, I decided to create the clouds using the Layered Angel Wings Die!  I love finding different uses rather than the obvious sometimes, don't you?  By doing so, it can definitely turn into something magical!  :)

Just like the last TH project, I used tons of different product.  With the exception of some vintage flocked wallpaper for the wings, the cast iron star and the window box, everything is Tim Holtz.  In case you see anything you like, here is a complete listing of everything I used...Bigz Dies:  Layered Angel Wings, Regal Crest; Movers & Shapers Dies:  Mini Hearts Set, NEW Oval, & NEW Postage Stamp; Kraft Core'dinations Nostalgic Cardstock, NEW Paper Stash Collage 8X8, Paper Stash Kraft Resist 12X12, NEW Elements Tissue Tape (the pointed fingers around the inside of frame),  NEW Elements Remnant Rub-Ons, NEW Label Letters, Chit Chat Stickers, Journaling Tickets, Lavish Trimmings, Game Pieces & Ranger's Rich Red Embossing Powder.

Since Valentine's is just around the corner, I think this piece is perfect for this time of year.  Checking out some different challenges around the web, I found a Valentine's Day/Love & Ribbon Challenge over at Really Reasonable Ribbon's Blog.  I decided to enter my "Let Your Heart Take Flight" into the challenge.  Why not?  :)

Have a great evening!
Amy

Sunday, January 13, 2013

Tim Holtz Card & Favorites @ Paper Issues!

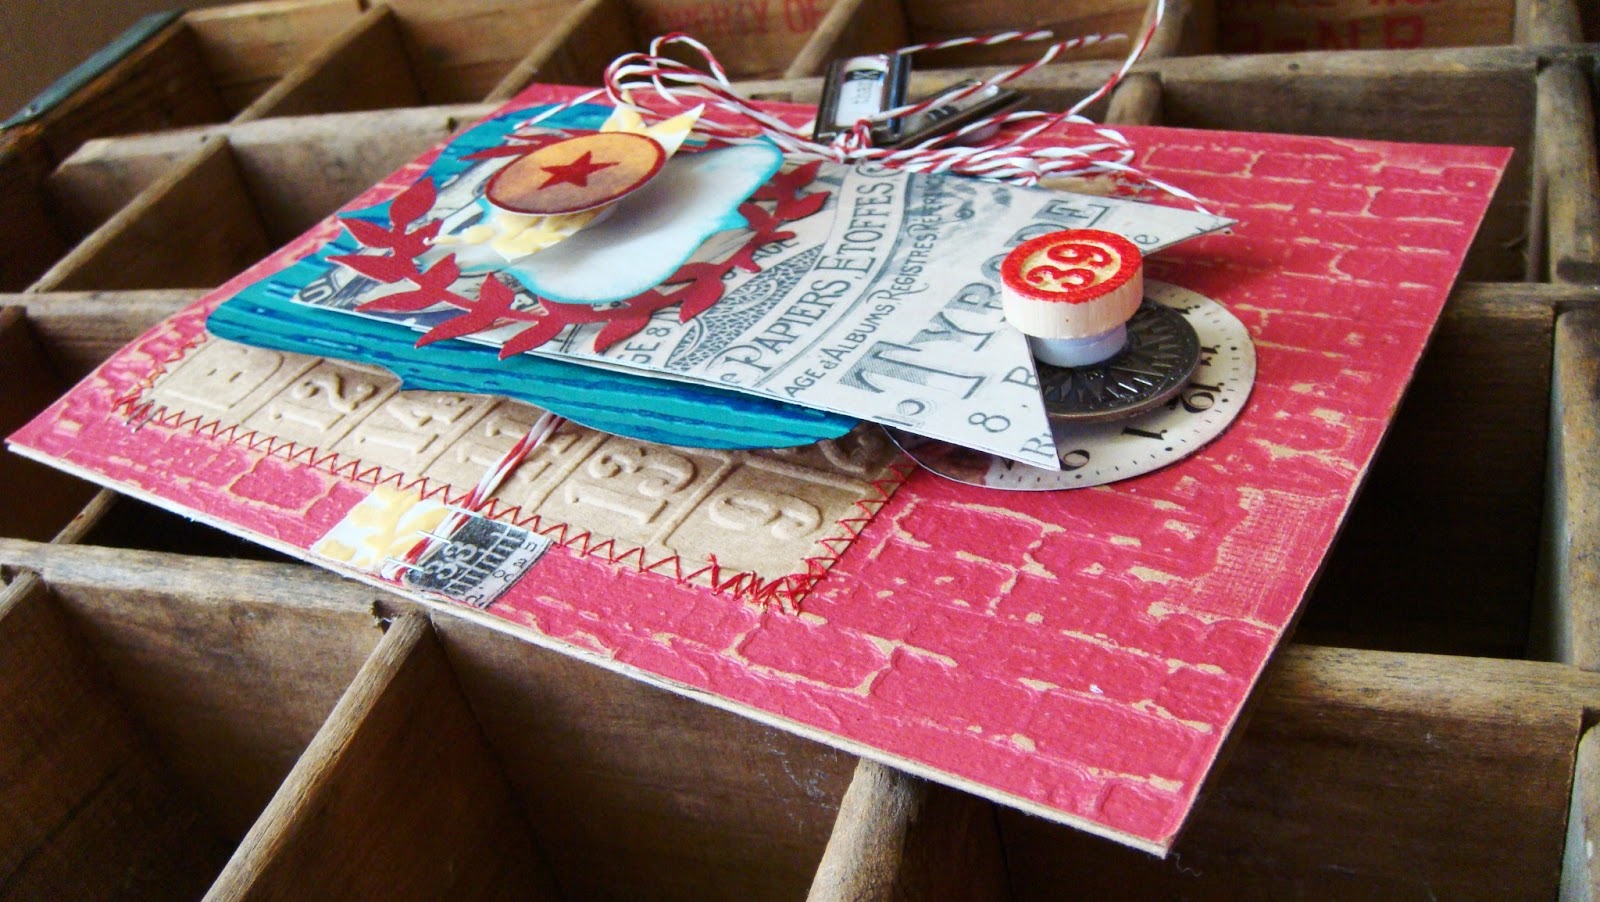
As promised, I will start sharing the projects I created for Tim Holtz CHA 2013.  This thank you card is the first project I created.  As a designer, I was primarily chosen for my intense layering style and my use of Tim's Sizzix dies.  To start creating, I chose to incorporate all of my "favorite" things.  What are some of my favorite things you ask?  I knew I wanted to use the Regal Crest Die; as I consider that particular die a staple tool for me.  It is so versatile, as you can see from the many past projects I have used it in.  I also wanted to do lots of the layering, and lastly I wanted to create with my favorite color combination:  red & aqua.

As for details on the card itself, there are tons.  Every single element on the card is from Tim Holtz with the exception of the yellow, vintage flocked wallpaper.  The beauty of creating Tim Holtz samples is that you get to incorporate both old and new product.  I used 3 different texture fades, 3 bigz dies, core'dinations kraft, paper stash, a game piece, paper twine & some of the newer findings like the metal tags & coins.

When I create, it is a lengthy process.  I can't just start attaching, painting & cutting. Unfortunately for me, I tend to over scrutinize every. single. detail.  I seriously move things around over and over again.  When I think I finally have it just so, I take a picture and then begin the process of assembly.  The machine sewing, the distressing, the stapling and adding all the dimension are the finishing step for me.  Insane isn't it?  I really admire those of you out there that just dive into your projects with wild abandonment and wind up with a masterpiece.  I really do wish my brain worked that way, it would truly save me lots of time and less stress!  :)

Since there's lots of materials used on the card, here is a comprehensive list of all the Tim Holtz product...Embossing Folders:  Bingo, Bricked & Woodgrain; Bigz Dies:  Regal Crest & Ornamental Movers & Shapers; Kraft Core'dinations Nostalgic Cardstock, NEW Paper Stash Collage 8X8, Lost & Found 12X12, NEW Label Letters, Chit Chat Stickers, NEW Tissue Tape Elements (ruler), Game Pieces, Paper Twine, NEW Compass Coins & NEW Tag Labels.

Because this is the first project I created for Tim Holtz & it exemplifies lots of my favorite things, I thought this would be the perfect "favorite" project for me to share for our newest theme at Paper Issues!  There is a huge blog hop going on, so you want to miss out.  Be sure to share your favorite project from 2012, we would love to see!

I can't wait to share more of my "Tim" projects! 
Stay tuned!  Amy

Friday, January 11, 2013

Designing for Tim Holtz???

Can you believe it???  Yes, you read that right.  Still not even comprehending the magnitude of such an opportunity, I will give you a little history on how all this even came about...

I am sure most of you already follow the blog, One Lucky Day.  Last fall, I was searching the internet for some vintage inspiration, and stumbled across One Lucky Day.  It was love at first sight for me, I seriously spent hours looking through years worth of posts! 

In November, One Lucky Day created and sold the most fabulous "Oh Christmas Tree" kit.  Let me tell you, it has to be the most amazing kit/project I have ever laid eyes on.  As soon as I saw it, I knew my mother and I just had to have it.  After e-mail communication with the ever amazing Paula Cheney, the rest is history.

Paula Cheney is the Creative Coordinator for Tim Holtz.  She found my blog simply from our e-mails back and forth in regards to the kit.   A few weeks later, I received an e-mail from Paula asking me if I would be interested in designing some samples for the upcoming CHA convention, and specifically for Tim Holtz!!!  Hello, that was a no brainer for me, who wouldn't jump at the chance! 

Getting to play with amazing new product and dies, I created 4 samples that made it all the way out to California.  I hope my creations have done Tim & Paula proud.  I can't wait to see the booth displays as they are unveiled tomorrow.  From all this, I have found that opportunities arise when you least expect it.  You never know what amazing experiences await you around the next corner. 

I want to give a special thank you to Paula.  For if it weren't for you, none of this would have been possible for me.  Thank you for appreciating my design style, and for choosing me to be one of Tim's designers.  It has truly been an honor.  :)

To all my readers out there, stay tuned as I start unveiling all my projects using tons of Tim's new products!  Happy Friday everyone!
Amy

Wednesday, December 12, 2012

The Junk Hippy "Holidays" Roadshow!

I am so excited to share the information for my upcoming appearance at The Junk Hippy "Holidays" Roadshow in OKC!  Kristen Grandi is the creative brainchild who has invented such a fabulous, unique event of one-stop shopping for everyone on your Christmas list.  I attended the debut Junk Hippy Roadshow here in OKC back in June of this year.  I absolutely loved everything about it.  If you are a lover of vintage, ecclectic junk and all things handmade then you will love it too.  In fact it has been such a hit, Junk Hippy has over 7,500 followers on their Facebook page.  And that is just since June people!  Won't you help Kristen continue her rise to fame by liking her Junk Hippy page on Facebook?  She is so close to 8,000 and if you could check it out, you will be glad you did.  Quick to note, even though the Junk Hippy Roadshow originates here in Oklahoma, Kristen has taken this fabulous show on the road!  This summer they were in Amarillo, followed by a show in Arlington, TX.  There are shows scheduled in Little Rock, AR and Houston, TX for Spring 2013.  You will definitely want to follow, as the Roadshow could soon be arriving to a city near you!  :)

Junk Hippy "Holidays" is this Saturday & Sunday in the Centennial Building at the Oklahoma City Fairgrounds.  If you live locally, please be sure to leave me a comment letting me know if you would like to be in a drawing for 2 free admissions!  I hope to see you soon!
Amy

Sunday, December 2, 2012

50 Shades of Basic Grey Blog Hop

I am happy to be a part of the newest theme over at Paper Issues:  50 Shades of Basic Grey!  For the theme, I had to choose one of their newest collections to work with.  They are all very pretty, but my personal choice was Lucille.  Not only because of all the robin egg blue contained within the paper, but because Lucille was my precious grandmother's name, so that was a given for me.  :)

I make lots of perpetual calendars, but this is a first to create on a vintage ceiling tile.  You probably can't tell from the photo itself, but it is rather large.  The overall measurements of the tile itself are 2' X 2'.  It started out white, with tons of rust.  I decided to paint it that sweet aqua color to accentuate the papers.  Adding some Saddle Brown StazOn really gives dimension to the beautiful texture in the metal and adds some distress to the piece.  Rather than choosing only 1 or 2 papers, I really wanted to showcase lots of the beautiful designs, so I opted to create a patchwork pattern for the calendar grid.  Coupling lots of vintage findings with the BG Lucille Collection Pack, embroidered tags, Snippets & wooden buttons makes for a rather elaborate calendar.  My favorite element of the overall piece is definitely the prize ribbon I made using a vintage tart tin, that crazy cool vintage brooch and some yummy ribbon.  The pennants are magnetic so that is an extra fun interactive touch.  Imagine the possiblilties of the designs you could create with those sweet little triangles.  :)

Now onto the important stuff & a giveaway!
As I mentioned, I am part of the 50 Shades of Basic Grey Blog Hop.  Those of us on the hop are showcasing the endless possibilites of what you can create using the delicious papers from Basic Grey.  Here is the order..

We are hoping that you would like to join in the fun by linking up your own fabulous creations. Either using your favorite Basic Grey goodies, or simply using the color "grey" which is so hot right now. Just be sure to keep it PG...I have heard that 50 Shades of Grey is pretty steamy...I personally haven't read any of the series yet....of course all of my friends say it is a definite must read!

Paper Issues is going to be giving away 3 prizes!  Now is your chance to win one of the 3 new Basic Grey Collections!  Who wouldn't love to win some swag!  Here are the rules to win:
3. Leave a comment that you did both
4. Link up a project for a Bonus entry

Thanks so much for stopping by!
Amy :)


Tuesday, November 27, 2012

Earth angel, earth angel, would you be mine?

So I am very into songs and sayings as inspiration in my creations lately.  I love how such a simple statement or few words can convey different thoughts or memories in every person that sees it. 

Today I would like to share my newest babies, my "earth angels."  I recently went to an architectural salvage auction and scored over FIFTY architectural pediments!  I absolutely love these things.  Decorating the outside facade of old buildings, each piece reveals such history with all the dings and distress in the wood.  I love all the chipped paint, the ornate carvings and uniqueness in each and every one. 

Most of my mixed media works like my windows are always on such a grand scale, it is sometimes nice to work from a smaller base.  I decided to make 10 of these fellas for my recent art show and they were a very popular item.  I only have a few left, so I am thinking I will save 2 of them for my Jack & Sam.  What a sweet keepsake for them.  Knowing that their mama created them will make them extra special for years to come.  Even though they can be little monsters most of the time, they are definitely my little earth angels.  :)

As for the details on these pediments, I will give you a quick run down on how I created them.  Basically I took the pediments in their worn state and stamped a newsprint background using black Staz-on for a bit of a grungy look.  Next, I found these small globes that I sawed in half.  This had to be the hardest part of the project.  Have you ever tried to saw through a resin ball using a coping saw?  Let me just tell you, it is no fun!  Next, I painted a fun robin egg blue color on the alternating bands for added interest and a pop of color.  After sealing the globe with polyeurethane, it was ready to glue onto the pediment.  Next, I needed to find a way to adhere my wonderful vintage wings to the globe.  As you have seen in many of my projects before, I LOVE using these wings.  They are so unusual.  So unusual, I am sad to say there are no more to be found.  I originally scored 20 of them at an estate sale about a year ago and can officially say, I have finally used every single one!  I got in touch with the daugher about the wings and she says her mother used to create them in the early 50's out of liquid composition.  Unfortunately I have searched all over the internet trying to find such a mold or the rubber composition she spoke of with no success.  So, if any of you know where I could find it I will be happy to compensate you nicely!

I digress I know, but back to the details...
I decided to split the wings down the center and affixed them onto the wood using E600.  Totally toxic, but definitely has a super strong hold.  Next, I grouted around the globe and wings to accentuate the dimension.

To finish, I did lots of brainstorming for different phrases or words to add at the bottom.  Once the words "earth angel" rolled off my tongue, I knew that was it!  Not only do you think of the old doo wop hit from the Penguins, but it also makes me think of people in this world that are truly angels on earth.  Whether it is those special people in my life that I love, or simply a person that is all about saving our planet, they all evoke happy thoughts.

The letters are all from vintage games...scrabble, anagrams & keyword.   The fabulous plaster letters came from a vintage art deco movie titling kit.  Truly vintage and so rare, I love this stuff!

Sunday, November 18, 2012

Girlie Show Wrap Up & Holiday Happy!

Well, hello everyone!  As you can probably tell from my blogging hiatus, it has taken me awhile to recoup from all the Girlie Show buzz!  The show was a great success once again!  I made lots of new friends, and had many return customers.  It's always great to see everyone at the Girlie Show.  Such a festive, fun atmosphere!  :)

After cranking out the pieces for such a large show, it is always fun to finally sit back and share with you all of my newest creations, a little at a time.  My newest window, titled "Peace, love & JOY" was inspired by an email advertisement I received a few weeks back.  It is so amazing what inspires us to create isn't it?  Using the beautifully rich red/cream background paper coupled with the cream and aquamarine tile makes for a very festive piece.  Not initially intended to be specifically for Christmas, it sure seems to fit right in with the holiday colors!  However, I think this color scheme works beautifully year round.  What I especially love about this piece is the added dimension of the kraft paper on top of the glass.  Such a happy piece, a constance reminder for peace, love and joy!  :)

Since this piece has such a festive feel, it is the perfect time for me to share with you the newest theme going on over at Paper Issues"Holiday Happy" entails anything that the holiday season may mean to you.  From gift tags, to layouts or home decor, we would love for you to share with us!  There is also a very festive prize up for grabs if you play along.  Please stop by Paper Issues for all the details!
Darcy & I @ Girlie Show 2012
The holidays are officially upon us!  Let the festivities begin!

PS, I want to send a special thank you to my wonderful friends Darcy & Jemellia who helped me out so graciously during the Girlie Show.  I couldn't have done it without you!

Tuesday, October 23, 2012

PARTY. ROCK. POWER SHOP.

It's almost here!  The 9th Annual Girlie Show OKC will be here in less than 10 days! 

As many of you know, I am a mosaic artist.  I am excited to say that I have been selected to be in this year's show once again.  :)  This is actually going to be my 6th showing as one of the girlie girls.  Of all the art shows I have done in the past, this one is by far my most favorite.  It is a fast-paced, high-energy, exciting show/party all wrapped into one.  How many art shows out there offer fabulous entertainment, delicious food, the coolest/rockin' music, and the most unique/wonderful art all packed into one event?  The Girlie Show it is! 

I know most of my readers live in other states, even in other countries.  I will tell you though, if you live in Oklahoma or any states remotely surrounding this area; this is definitely a must see to believe show! 

I apologize for not posting in awhile, but as you can see I am busily getting ready for this big event.  The Amy/one-man-factory is in full force, burning the midnight oil!  I must give thanks to my Frankie though...if it weren't for his maddening carpentry skills, I would be in trouble!

Hopefully I will be back before the show with a few sneaks to peak your curiosity further! 
Talk to you soon!
Amy

Saturday, October 6, 2012

It's World Card Making Day!

My family knows me as the card making queen whenever I am not too busy working on my mosaics.  Right now I am very busy getting ready for a big art show that I will give details about in the very near future.  :)

Since I haven't had the luxury of time on my hands of late, I thought I might share with you some cards I made several months ago that I have never shared on my blog.  I initially had created them for a Crate Paper Color Challenge, and loved the way they turned out.  One was sent to a dear blogger friend, Valerie.  The other I gave to my aunt for her birthday.

In addition to paper & cardstock, I incorporated lots of other materials...copper, feathers, vintage pom pom trim and a bingo marker.  By doing so, it made for lots of lovely texture. 

I have shared some cards with you for World Card Making Day, and now it's your turn.  I would love to see some of the cards you have made recently or even today for that matter!  Paper Issues is having a giveaway on Facebook in honor of this special day.  By posting one of your lovely creations on their page, you have a chance to win a $20 gift card to Paper Issues!  Please go here for all the details!

Have a great Saturday Night!
Amy

Wednesday, September 26, 2012

Fall'n for Flair

Paper Issues has issued the newest theme:  Fall'n for Flair.  With the start of fall finally here, it is refreshing to feel a bit of crispness in the air.  Especially here in Oklahoma, where we are known for 100+ temperatures all summer long it seems.  As for the flair, I am all about it!  You know me for my mosaics and my calendars.  I would have to say my calendars are dripping with tons of flair, wouldn't you agree?

Today I share with you 2 calendars I created for 2 sisters both with their own sense of style.  As you can see they were each custom created to suit their favorite color schemes and patterns.  When designing them, they both gave me artistic license to create.  It is so fun to play with these calendars with so many little bits and doodads.  So much vintage goodness from years gone by.  Having a huge stash of numbers I have collected over the past few years, it is almost like putting together a puzzle every time.  I hope that Holly and Heather have been enjoying their calendars, month after month!  :)

Don't forget to share your "flair" projects with us at Paper Issues.  You might just be featured with your awesome project, and there is some "fabulous flair" up for grabs.  Check out the info for the giveaway here, and link up here!

Happy Tuesday!

Sunday, September 9, 2012

Tag, You're It!

Good morning! I am excited to present to you Paper Issues latest theme: Tag, You're It! To get this party started, we are having a blog hop with some fabulous projects and a killer giveaway you will definitely want to win! Here is a list of all the girlies participating in the hop to get you started...
1. Bethany http://ribbonglitterandglue.blogspot.com/
2. Christina H http://www.facebook.com/l.php?u=http%3A%2F%2Fchristinaheeren.blogspot.com%2F&h=-AQHbWcze&s=1
3. Kelly Jo http://www.kellyratcliff.com/
4. Melissa Gener http://www.missygener.com/
5. Amy B. http://www.curlyqmosaics.blogspot.com/
6. Ashli http://purplemailbox.blogspot.com/

In honor of the newest theme, I created a sweet gift bag embellished with tags for a dear friend of mine's birthday. She has lots of beautiful "keepsake" books she has created over the years that are true masterpieces. Dripping at the seams with tons of ribbon, fabric, ephemera and notes from dear friends I knew she would appreciate these sweet tags to add to her collection. To make these reusable for her, all the tags are simply clipped together by use of a clothespin covered in some Hambly woodgrain washi to make it extra pretty. I created the tags using lots of Tim Holtz dies and 7Gypsies goodies. My favorite 2 would be the copper birdcage with the glass glittered bird and the K & Company Naked Chipboard Tag I completely transformed with the use of aqua chalk ink, the lovely Cradle Robin Nest from Prima and the white vine created from Tim Holtz' Regal Crest Die.

The trophy you see is the actual present. Let's just say the tags are the "icing on the cake." :) For the trophy itself, it is completely transformed from it's original state. I wanted something to hold the bird in, so I opted to use a trophy cup. The cup turned out beautifully. I used German Glass Glitter on it. My first time ever using the stuff. Talk about beautiful to the naked eye. I wish you could see it in person, these pictures just don't do it justice. As for the trophy, I filled the top with krinkled kraft to create a nest if you will. The paper medallion was created using Crate Paper, May Arts ribbon & a Martha Stewart felt cupcake to top it off. Lastly, I added the kraft tags on there. See? The possibilities are endless as to what you can do with tags. They are so versatile, they can dress up just about anything. They are not just needed to dress up packages anymore! :)

In keeping with my typical style, I favor using vintage or upcycled pieces in my work. As mentioned, the trophy & the clothespin are completely given a new life. The ornate vine on the tag I created is from a vintage vinyl tablecloth with such amazing embossed texture. The "give" tag was created using a vintage "sight words" card I simply trimmed down and tied some seam binding to.  Speaking of upcycled, I am also sharing this project with the folks over at Lessology since their challenge this month is "It's A Wrap!"

Okay, now onto the "issue" at hand. As I mentioned at the beginning of this post, Paper Issues is having a huge giveaway in conjunction with this newest theme, Tag You're It. The grand prize is an eBosser from Craftwell! Can you believe it! It is a $200 value! All you need to do for your chance to win are a few simple things: follow my blog, Paper Issues, and like Paper Issues on Facebook. Easy peasy!

Be sure to continue following on the hop to the amazing Ashli for more inspiration. Make sure to share your "tag" projects with us at Paper Issues, we would love to see what you've got! Lastly, if you are in the market for some fabulous scrapbooking goodies please be sure to peruse Paper Issues' Shop and use promo code CURLYQ for a 20% discount!
Thanks for stopping by! Have a fabulous day!
Amy


Wednesday, August 29, 2012

All About Me Banner & New Paper Issues Theme!

Sam came home from school the other day with a big white piece of paper shaped like a banner. His teacher sent it home for him to create "an all about me" banner to be hung up in his classroom for the entire year. The teacher also said that it was to be completed with the help of parents and could be as simple or elaborate as we wanted. As soon as I saw that parents were to help and that it could be elaborate, of course I saw that as a green light to get creative. I had to keep in mind that Sam is only in Kindergarten and is still very much trying to learn his ABC's, let alone write each and every letter. I wanted to create with Sam but also using it as a tool to help him practice his writing and hand control with cutting and coloring.

To create the banner, we started with the white 12X18" base. Digging through my stash, I came accross some cool Cavallini file folders that repeat the alphabet over and over in rich, warm colors. I opened it up and it fit perfectly into the banner shape. All I had to do was cut the triangle at the bottom and staple it on. Next, I gave Sam some vellum and had him trace the entire alphabet once in pencil and then again in Sharpie. I punched each letter out with a 1/2" hole punch and randomly placed them directly onto the folder. I cut Sam's name out using the Cindy Loo Cricut Cartridge. The black cardstock worked perfectly to emulate a chalkboard. I gave sam a white oil pastel to color in his name. It shows up so well against the black. We then decided to go through pictures that show who Sam is, and what he loves. We chose 10 different pics to represent his love of swimming, his birthday, Halloween/candy, his brother, catching frogs, hats, his dog Murphy, going on trips/hotels/cabins, his I-touch/music, and IHOP! I printed them at 1" and foam mounted them to create some dimension. Sam loves helping me with those foam dots, I always seem to find them stuck to walls, doors and anything else he can get his hands on. :) I cut a few white squares and had Sam draw with his favorite color red a smiley face and the number 5 to represent his age. The last part was creating the ribbon to tie it all together. I printed and cut a photo of Sam on his first day of school. Then I drew a circle and had Sam cut it out in yellow stripe and red. I cut all around the edges to give it a fringed appearance. We took some MME Lost & Found II striped paper and stamped all the things that represent each photo. I had Sam help me find all the letter stamps to spell out the words. That was probably the most timely process of all. Sam picked out some ribbon, we added the "I am" and the shiny heart for the finishing touch. Sam was so proud of it, he was so excited to bring it to his teacher. For photographing purposes, I hung the banner using a vintage wooden pant hanger. I found and purchased 18 of them at an estate sale last weekend for $0.25 a piece. Score! I think I will be incorporating them into future projects. :)

Now onto the Paper Issues Theme! This week's theme is "Apple for the Teacher." There are some crazy cute projects that have already been linked up. Be sure to check out the blog hop as well. There is an amazing "FITkit" up for grabs so it is a win-win for you to stop by. Until next time! Amy